)
Quick reference
Note: This reference has not yet been updated for iOS 17.
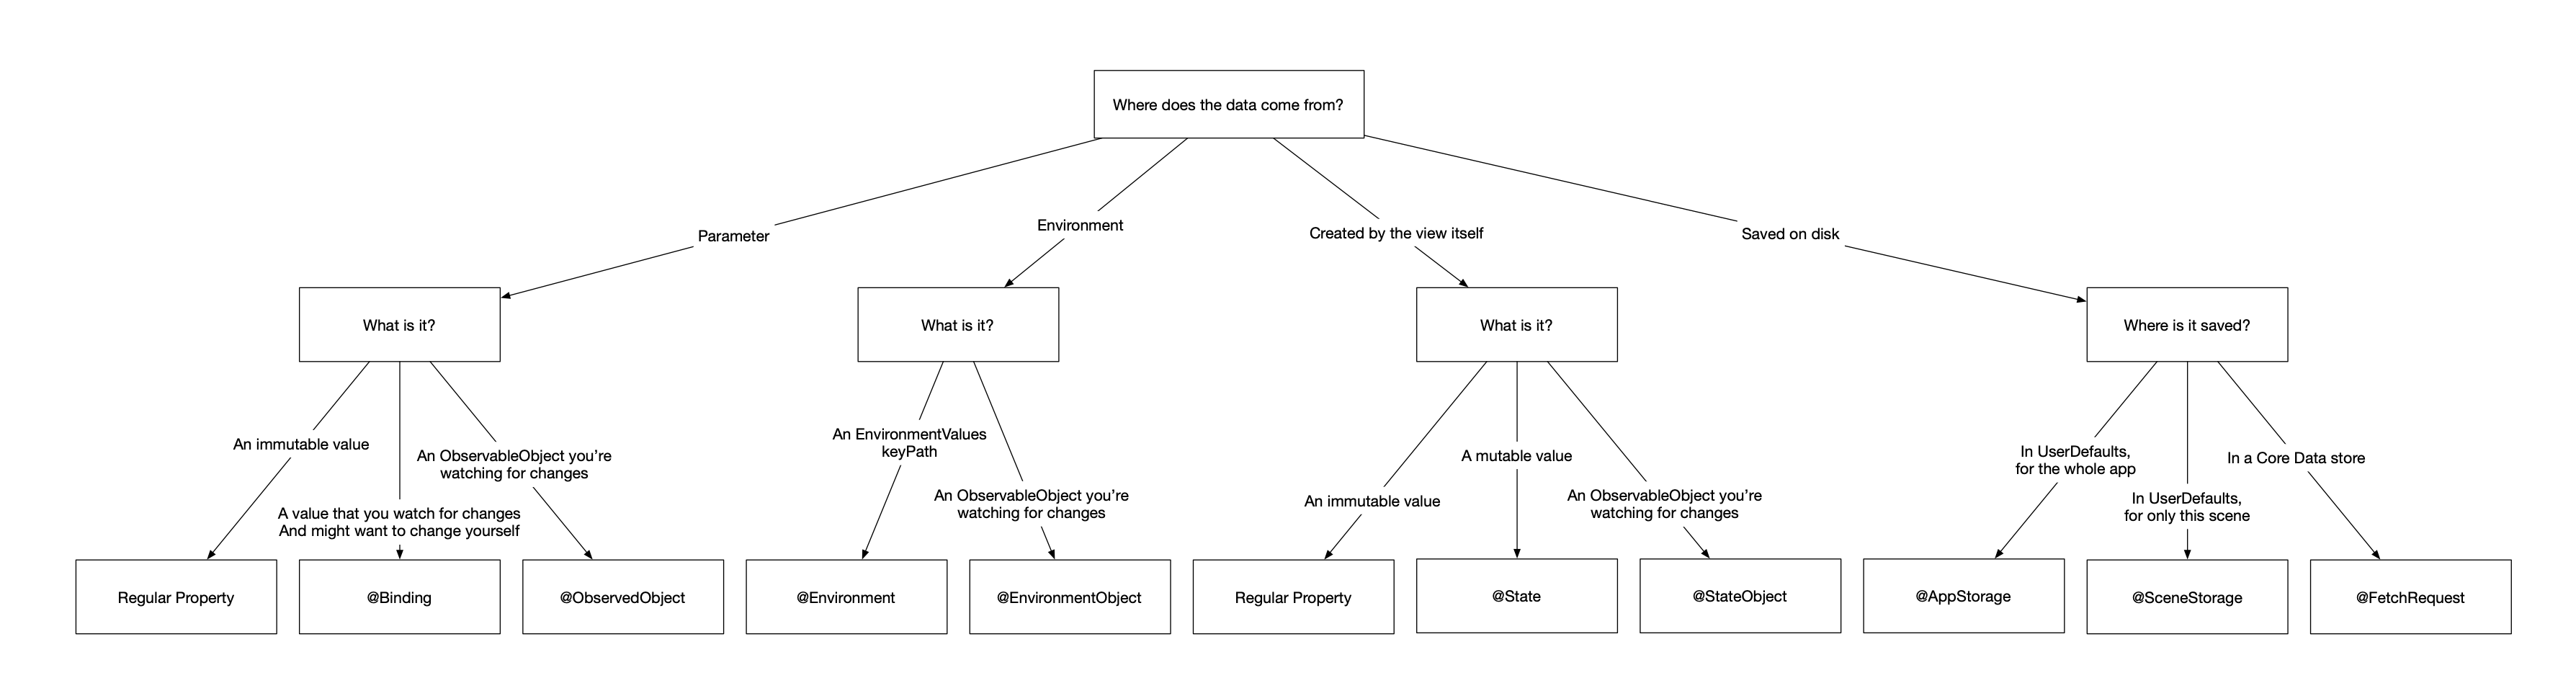
Table of Contents
- @State
- @Binding
- @Bindable
- @StateObject
- @ObservedObject
- @EnvironmentObject
- @Environment
- @FetchRequest
- @AppStorage
- @SceneStorage
@State
The @State property wrapper is used inside of View objects and allows your view to respond to any changes made to @State. You use @State for properties that are owned by the view that it's contained in. In other words, a view initializes its @State properties itself. It does not receive its @State properties from another object.
struct StateExample: View {
  @State private var intValue = 0
  @State private var modelObject = MyModelObject()

  var body: some View {
    VStack {
      Text("intValue equals \(intValue)")

      Button("Increment") {
        intValue += 1
      }
    }
  }
}
Internally, SwiftUI will store your @State property's value and persist its value throughout re-renders of your view. This makes it a good fit for state that is managed by the view itself and should be persisted when SwiftUI must discard and recreate your view instance during a refresh.
WIth @State, your view rerenders when a new value is assigned to your @State property.
You will typically apply @State to:
- Primitives like
Int,String, etc. - Structs where mutation leads to assigning a new value to your
@State. - iOS 17+:
@Observableobjects that are owned by the view.
Note that you should mark your @State properties private as a best-practice. No external sources should modify your @State properties.
Deciding if you should use @State
You should use @State if:
- The view itself creates (and owns) the instance you want to wrap.
- You need to respond to changes that occur within the wrapped property.
- You're wrapping a value type (
structorenum). - iOS 17+: You're wrapping an
@Observableobject.
Note that you can also use
@State on reference types (class) but changing properties on the instance itself won't count as an update. Not even if the property you changed is@Published. See @ObservedObject, @StateObject, and @EnvironmentObject for ways to handle this better. On iOS 17+, objects annotated with the@Observablecan be annotated with@Stateand updates will work. The@Observablemacro uses a special mechanism to communicate model changes to the view.
@Binding
The @Binding property wrapper is used for properties that are passed by another view. The view that receives the binding is able to read the bound property, respond to changes made by external sources (like the parent view), and it has write access to the property. Meaning that updating a @Binding updates the corresponding property on the view that provided the @Binding.
struct BindingView: View {
  @Binding var intValue: Int

  var body: some View {
    VStack {
      Button("Increment") {
        intValue += 1
      }
    }
  }
}
This is an example of a view that receives a Binding and modifies it what a user taps a button. You would use this view as follows:
struct StateView: View {
  @State private var intValue = 0

  var body: some View {
    VStack {
      Text("intValue equals \(intValue)")

      BindingView(intValue: $intValue)
    }
  }
}

struct BindingView: View {
  @Binding var intValue: Int

  var body: some View {
    Button("Increment") {
      intValue += 1
    }
  }
}
Notice that I pass a binding to the @State wrapped intValue to BindingView by prefixing it with a $: $intValue. The projected value of a @State property is a Binding<T> that you can pass to child views so they can modify @State properties through the binding rather than directly.
Internally, SwiftUI will not keep a @Binding around when your view is discarded. It doesn't need to because the @Binding is always passed by an external source. Unlike @State where SwiftUI keeps the property around so its value persists when a view is discarded and recreated for a fresh render.
Deciding if you should use @Binding
You should use @Binding if:
- You need read- and write access to a property that's owned by a parent view.
- The wrapped property is a value type (
structorenum). (You can also use an@Bindingfor reference types (class) but it's not nearly as common.) - You don't own the wrapped property (it's provided by a parent view).
@Bindable
The @Bindable property wrapper is used to create bindings to properties on your @Observable annotated models. Without @Bindable it's not possible to create a binding to an @Observable model. For example, the following code doesn't compile:
@Observable
class SearchModel {
  var query: String = ""
  var results: [SearchResult] = []

  // ...
}

struct SearchView {
  let searchModel: SearchModel

  var body: some View {
    // Cannot find '$searchModel' in scope
    TextField("Search query", text: $searchModel.query)
  }
}
The $ prefixed version of a property is only avaialble when that property leverages a property wrapper since $myProperty accesses something called a projected property. If you're not entirely sure what that means, I recommend you take a look at this post.
Given that we can't bind to our plain SearchModel's properties, we need some mechanism to enable this. One option would be to make our own Binding instances and passing a get and set closure. This would be tedious and error prone.
The alternative is the @Bindable property wrapper:
struct SearchView {
  @Bindable var searchModel: SearchModel

  var body: some View {
    // This works
    TextField("Search query", text: $searchModel.query)
  }
}
With @Bindable we have access to the $ prefixed property to obtain a projected value from the property wrapper, and the projected value provides our binding. In other words, we can now provide a binding to our model's query property where we otherwise would not be able to do this.
One neat trick you might need to employ for observable objects that exist in the environment for example is the following:
struct SearchView {
  @Environment(\.searchModel) var searchModel

  var body: some View {
    @Bindable var bindableSearchModel = searchModel
    // This works
    TextField("Search query", text: $bindableSearchModel.query)
  }
}
With this technique you extract the search model from the environment as a non-bindable property. To make it bindable, you can create a shadow property inside of your body that's marked as @Bindable.
Deciding if you should use @Bindable
You should use @Bindable if:
- You're wrapping a class annotated with
@Observed - You need to provide another view a binding to a property on your model object
Note that you never choose between @Binding and @Bindable. @Binding indicates that a view needs to receive a binding to a property so it can read and mutate state owned by another object. @Bindable indicates that we want to pass a binding to that property to another view, allowing that view to read and mutate the property.

@StateObject
Only available in iOS 14+, iPadOS 14+, watchOS 7+, macOS 10.16+ etc. On iOS 17+ you will most likely leverage the
@Observablemacro for your models instead of one of theObservableObjectrelated property wrappers.
The @StateObject property is used for similar reasons as @State, except it's applied to ObservableObjects. An ObservableObject is always a reference type (class) and informs SwiftUI whenever one of its @Published properties will change.
class DataProvider: ObservableObject {
  @Published var currentValue = "a value"
}

struct DataOwnerView: View {
  @StateObject private var provider = DataProvider()

  var body: some View {
    Text("provider value: \(provider.currentValue)")
  }
}
Notice that DataOwnerView creates an instance of DataProvider. This means that DataOwnerView owns the DataProvider. Whenever the value of DataProvider.currentValue changes, DataOwnerView will rerender.
Internally, SwiftUI will keep the initially created instance of DataProvider around whenever SwiftUI decides to discard and recreate DataOwnerView for a fresh render. This means that a @StateObject for any given view is initialized only once.
SwiftUI sets the instance associated with your @StateObject aside and reuses it when the view that owns the @StateObject is initialized again. This means that your new view instance does not get a new instance of the property marked as @StateObject since it's reused.
In other words, a property marked as @StateObject will keep its initially assigned ObservedObject instance as long as the view is needed, even when the struct gets recreated by SwiftUI.
This is the same behavior you see in @State, except it's applied to an ObservableObject rather than a value type like a struct.
Deciding if you should use @StateObject
You should use @StateObject if:
- You want to respond to changes or updates in an
ObservableObject. - The view you're using
@StateObjectin creates the instance of theObservableObjectitself.
@ObservedObject
On iOS 17+ you will most likely leverage the
@Observablemacro for your models instead of one of theObservableObjectrelated property wrappers.
An @ObservedObject is used to wrap ObservableObject instances that are not created or owned by the view that's used in. It's applied to the same types of objects as @StateObject, and it provides similar features, except a view doesn't create its own @ObservedObject instances. Instead, they are passed down to views like this:
struct DataOwnerView: View {
  @StateObject private var provider = DataProvider()

  var body: some View {
    VStack {
      Text("provider value: \(provider.currentValue)")

      DataUserView(provider: provider)
    }
  }
}

struct DataUserView: View {
  @ObservedObject var provider: DataProvider

  var body: some View {
    // create body and use / modify `provider`
  }
}
The DataOwnerView passes a reference to its @StateObject down to DataUserView, where the DataProvider is used as an @ObservedObject.
Internally, SwiftUI will not keep an @ObservedObject around when it discards and recreates a view if this is needed for a fresh render.
Instead, SwiftUI knows that the parent view will pass down an ObservedObject (which could be either a @StateObject if the parent owns the property, or an @ObservedObject if the parent doesn't own the property) that's used as the value for the property marked as @ObservedObject.
Deciding if you should use @ObservedObject
You should use @ObservedObject if:
- You want to respond to changes or updates in an
ObservedObject. - The view does not create the instance of the
ObservedObjectitself. (if it does, you need a@StateObject)
@EnvironmentObject
On iOS 17+ you will most likely leverage the
@Observablemacro for your models instead of one of theObservableObjectrelated property wrappers.
Sometimes you have objects that are needed in various places in your app, and you might not want to pass these objects down to the initializer of each view you create. In those cases, you might want to make a dependency available to all children of a view, your App or a Scene.
You can achieve this with @EnvironmentObject:
struct EnvironmentUsingView: View {
  @EnvironmentObject var dependency: DataProvider

  var body: some View {
    Text(dependency.currentValue)
  }
}
Properties that are marked as @EnvironmentObject must conform to ObservableObject. They are configured by a parent object of the object that uses the @EnvironmentObject. So for example, we can inject an environment object from the App struct to make it available for us in all views that we create:
struct MyApp: App {
  @StateObject var dataProvider = DataProvider()

  var body: some Scene {
    WindowGroup {
      EnvironmentUsingView()
        .environmentObject(dataProvider)
    }
  }
}
An @EnvironmentObject shared the same functionality that an @ObservedObject has. Your view will re-render when one of the @EnvironmentObject's properties changes. The main difference is that @EnvironmentObject properties are made available on a much larger scale than @ObservedObject. In same cases even to your whole app.
Deciding if you should use @EnvironmentObject
You should use @EnvironmentObject if:
- You would normally use an
@ObservedObjectbut you would have to pass theObservableObjectthrough several view's initializers before it reaches the view where it's needed.
@Environment
The @Environment property wrapper is similar to @EnvironmentObject with one major difference. It's used to read values from the view's environment. If the value in the environment changes, your view is updated. You can't use this property wrapper to set or modify an environment property. To set an @Environment property on a view you need to use the .environment view modifier. A nice way to think of @Environment is this: @Environment is to @EnvironmentObject what @State is to @StateObject.
You can read a value from the environment as follows:
struct MyView: App {
  @Environment(\.colorScheme) var colorScheme: ColorScheme

  var body: some View {
    Text("The color scheme is \(colorScheme == .dark ? "dark" : "light")")
  }
}
To assign a value to a view's environment you'd write the following:
ContentView()
    .environment(\.managedObjectContext, Persistence.shared.viewContext)
You can add a custom property to your view's environment as follows:
// The type we want to use for the custom environment value
enum AppStyle {
    case classic, modern
}

// Our environment key
private struct AppStyleKey: EnvironmentKey {
    static let defaultValue = AppStyle.modern
}

// Register the key on SwiftUI's EnvironmentValues
extension EnvironmentValues {
    var appStyle: AppStyle {
        get { self[AppStyleKey.self] }
        set { self[AppStyleKey.self] = newValue }
    }
}

// Example usage
@main
struct PropertyWrappersApp: App {
    var body: some Scene {
        WindowGroup {
            ContentView()
                .environment(\.appStyle, .classic)
        }
    }
}
Deciding if you should use @Environment
You should use @Environment if:
- You want to inject some value into the SwiftUI environment using a key.
- The injected property doesn't need to behave like an
@EnvironmentObject. - The property should be available to all views that are subviews of the view that received the
.environmentmodifier.
@FetchRequest
Fetch request is one of SwiftUI's persistence related property wrappers. You use it to retrieve data from Core Data. A brief example of how to use this property wrapper looks as follows:
struct ContentView: View {
    @FetchRequest(fetchRequest: MyModel.fetchRequest())
    var items: MyModel

    var body: some View {
        List(items) { item in
            Text(item.title)
        }
    }
}
Whenever the data loaded by @FetchRequest updates, your view will update too.
There are various overloads for the @FetchRequest initializer that I won't cover on this page; we'd quickly spiral into covering Core Data and how it should be added to a SwiftUI app. To learn more about that you can explore this talk. Or take a look at the Practical Core Data book for more details on Core Data and SwiftUI.
Deciding if you should use @FetchRequest
Use @FetchRequest whenever you want to fetch data from a Core Data store directly into your view.
@AppStorage
The @AppStorage property wrapper is an app-wide wrapper around UserDefaults. This means that it's great for storing simple key / value pairs. When the data in UserDefaults changes, your view reloads. You can update values in @AppStorage by assigning a value to your property.
Here's a simple example of using @AppStorage:
struct ContentView: View {
    @AppStorage("lastTap") var lastTap: Double?

    var dateString: String {
        if let timestamp = lastTap {
            return Date(timeIntervalSince1970: timestamp).formatted()
        } else {
            return "Never"
        }
    }

    var body: some View {
        Text("Button was last clicked on \(dateString)")

        Button("Click me") {
            lastTap = Date().timeIntervalSince1970
        }
    }
}
Note that @AppStorage isn't intended to hold a full data model for your app; it should be used for small, simple data.
Deciding if you should use @AppStorage
You should make use of @AppStorage when:
- You're storing simple user preferences.
- You want to track simple data like when the user last launched your app.
- You need to persist some very simple state that should service an app restart.
@SceneStorage
The @SceneStorage property wrapper is similar to @AppStorage except it only persists data local to the scene that your view is currently in. On iOS an app will typically have a single scene but on the mac and iPad an app can have several scenes. When a scene is temporarily torn down and restored later, your scene storage will be available again. If a scene is destroyed, all scene related data is destroyed too.
You should only use scene storage for state related data that's non-essential to your app.
You use @SceneStorage in a similar manner as @AppStorage:
struct ContentView: View {
    @SceneStorage("lastTap") var lastTap: Double?

    var dateString: String {
        if let timestamp = lastTap {
            return Date(timeIntervalSince1970: timestamp).formatted()
        } else {
            return "Never"
        }
    }

    var body: some View {
        Text("Button was last clicked on \(dateString)")

        Button("Click me") {
            lastTap = Date().timeIntervalSince1970
        }
    }
}
Deciding if you should use @SceneStorage
You should make use of @SceneStorage when:
- You're storing simple state related to the current scene
- The data you're persisting isn't sensitive or mission critical
Want to learn more?
- The WWDC 2020 session called Data Essentials in SwiftUI goes in-depth on the topic of SwiftUI's property wrappers.
- If you want to learn more about property wrappers as a general concept, check out this post.
- Learn more about how you can write your own property wrappers that work nicely with SwiftUI here.
- You can learn more about how SwiftUI decides to update your views here.
- Swift With Majid is a fantastic SwiftUI related blog.
- Nil coalescing is a blog by Natalia Panferova and Matthaus Woolard. It has some fantastic SwiftUI content, which isn't surprising because Natalia used to work on the SwiftUI team.